Eight steps to successful perennial pasture establishment
Reliable establishment is vital to ensure high levels of production and longevity from perennial pastures. Perennial pasture seeds are generally small with seedlings that are delicate and slow growing compared to most crops and many weeds. Greater care and attention to detail is therefore necessary to establish perennial pastures successfully.
The following checklist of eight critical steps will help you achieve successful establishment and reduce the risk of failure.
Optimum sowing times and species will vary with regions but the principles embodied in these eight steps will remain the same.
1. Select, assess and plan early - start at least 8-12 months before sowing
Key check: Assess the existing pasture, soil fertility, weed and pest risk
- Are the current pasture varieties well adapted and productive or should they be replaced?
- What livestock enterprise and potential pasture use is planned? – match these with appropriate species.
- Is a current soil test result available? – it can provide vital information to assist decision making.
- Is the soil pH and fertility level suitable for the proposed pasture? If not, reassess paddock selection, species, fertiliser, and need for lime or gypsum.
- What weed and insect pests need to be controlled? Competition from annual grasses is the major cause of poor establishment. Some weeds may need to be controlled over several years before sowing.
- Are any herbicide residues present that could affect the species being sown?
- Sowing equipment – ensure equipment capable of placing seed accurately is available and in working order.
- Budget carefully for the appropriate inputs – paddock preparation and sowing, herbicides, insecticides, seed, and fertiliser. Budget for fertiliser in subsequent years and extra livestock to make use of the extra feed grown.
2. Weed and pest control in preceding year(s)
Key check: Reduce weed seed reserves in the soil and insect pests by using techniques such as spray-graze, spray fallow, pasture-topping, spring fodder crops and integrated pest management procedures. This step must commence in the previous spring for autumn/winter sowing to prevent annual weed seed set.
- Is the boomspray calibrated and operating correctly?
- Are broadleaf weeds a problem? – consider the spray-graze technique.
- Are annual grass weeds a problem? Spray fallowing is preferred to spray topping because windy spring weather can prevent spraying at the correct time so that annuals still set sufficient seed to cause establishment failure during the following autumn.
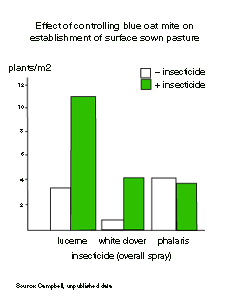
- What insect pests are present or likely to be present that may affect establishment? Strategic spraying in spring, to reduce the adult population that produces over-summering eggs, is very effective in reducing red legged earth mite activity the following autumn but may not be as effective for blue oat mites. Insecticides may be added to the spray fallow or other herbicide applications provided the strategic timing of the insecticide is not compromised and is consistent with label directions. Other pests of seedling pastures such as lucerne fleas, scarabs etc. will require different control measures.
3. Pre-sowing cultivation or grazing
Key check: Manage the paddock for 3-4 months prior to sowing to reduce trash and maximise weed germination.
- Conventional sowings – use cultivation in conjunction with herbicides.
- Direct drill or surface sowings – graze leading up to the sowing period to keep pasture only 1–2 cm tall when using sheep or 3–4 cm tall with cattle.
4. Absolute weed & pest control - the most important factor for success

Key check: Allow full weed germination after the break of the season. Either cultivate or graze to keep weeds small while waiting for optimum sowing conditions. Remember both red legged earth and blue oat mites hatch after the autumn break especially when maximum day temperatures are below 20°C. They start producing eggs 6-8 weeks later.
- As a rule, don’t sow on the first rain of the season (as subsequent weed germination is likely to be a problem).
- Identify what weeds are present or likely to be present.
– either use the appropriate herbicide at label rates, or
– cultivate to achieve a firm, fine weed-free seedbed. - Identify what pests are present or likely to be present and apply the appropriate insecticide. For earth mites, spray 4 weeks after the autumn break. This often coincides with the knock-down herbicide application prior to sowing.
- Where sowing into a dry seedbed is the only practical option (e.g. direct drilling cracking clay soils), good weed control in the previous season is paramount.
- Preferably sow without cover crops – these compete with the young pasture for moisture and light just like weeds.
5. Adequate soil moisture - enough for quick germination and survival of the sown pasture

Key check: Moisture extending from the surface to at least 20 cm
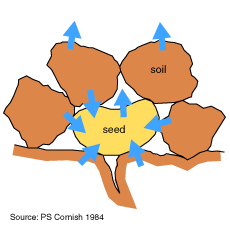
- Provide a firm, moist seedbed. This allows close contact between the soil and the seed. Seeds can then absorb moisture, germinate and emerge more quickly and reliably. (Arrows indicate direction of moisture flow.)
- Sow when conditions are best for germination and survival
– temperate perennials: from autumn through to early spring (depending on the district)
– sub tropical species: sow late spring to early autumn. - Generally avoid dry sowing as it increases the risk of failure. Where dry sowing has been successful, competition from weeds has been minimal and germinating rainfall has been sufficient for seedling survival until follow-up rain has fallen.
- For temperate species which can be sown in the cooler months, adequate soil moisture is more important than time of sowing.
6. Accurate seed placement - neither exposed nor buried too deep

Key check: For direct drill sowings of most small seeded species, 5% of seed/fertiliser should still be visible in the row; for ploughed seedbeds, tilth over the seed should be no more than 1 cm deep.)
- Direct drilling
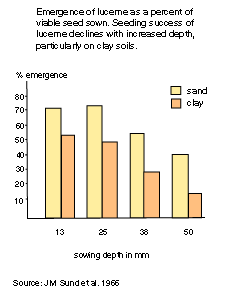
– Average furrow depth 25 mm, provided the furrow remains open, with 1–2 cm of loose soil over the seed.
– Use inverted ‘T’ sowing points when direct drilling.
– Don't use harrows or rollers. - Conventional sowing
– Beware of sowing too deep especially when the seedbed is loose and fluffy.
– Rolling can enhance seed-soil contact but beware of surface crusting in some soils. - Use seed that is certified or quality assured wherever possible and check its germination and purity.
- Use sufficient seed to ensure a dense pasture.
- Be aware of specific requirements of some species e.g. Rhodes grass, lovegrass and wallaby grass require very shallow sowing.
- Be aware that some soil types such as heavy cracking clays can lose moisture quickly after sowing while other clays are prone to surface crusting or frost lift in ploughed seedbeds.
- Ensure legume seed is inoculated with the correct strain of rhizobia and where necessary, lime pelleted. Molybdenum, insecticides and fungicides can be applied to seed to enhance establishment in many situations.
- Provide good nutrition – Apply adequate phosphorus, sulphur and molybdenum at sowing time.
Use nitrogen fortified (compound) fertilisers for direct drill sowings (maximum rate, 20 kg N/ha).
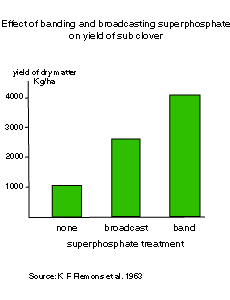
Banding fertiliser near the seed is four times more efficient than broadcasting.
7. Monitor weeds & pests regularly after sowing

Key check: Look for pests and weed seedlings at 10-14 day intervals after sowing. This check is most often overlooked.
- Check pastures for pests regularly. For earth mites this may require close inspection on hands and knees and using glasses if needed for reading. Treat young pastures immediately if mites are found – many mites will probably not be seen.
- The likelihood of insect pests being present is generally greater in direct drilled than conventionally sown new pastures.
- Control weeds with selective herbicides or possibly with grazing in grassy situations.
- In direct drilled pastures under warm, moist spring conditions, slugs may be a problem. Slugs can be detected by placing wet paper under bags or boards at several sites. A registered insecticide is available for use at or after sowing if they pose a significant threat.
8. Initial & subsequent grazing
Key check: Are grasses 10-15 cm tall and well anchored and is there good soil moisture?
- Once grasses are 10–15 cm tall and under good growing conditions, a quick grazing will enhance tillering and root development. Graze heavily but quickly down to 2.5 cm then rest.
- Always allow grasses to set seed in the first year. Hay cutting is never recommended in the first year.
- Never graze newly sown pastures early under dry conditions or if grasses are poorly developed.
- Avoid grazing aerial or surface sown pastures before they set seed. They are rarely well anchored and are easily pulled out. Stock moderately in the following growth season (e.g. autumn for temperate species, spring for sub tropicals).
- Some pastures have specific grazing requirements (e.g. lucerne and chicory require rotational grazing for good persistence).
- Recent research suggests perennial grasses will be more persistent when rested, especially under adverse conditions i.e. given some form of rotational grazing at least for part of the year.
- The most efficient grazing system for any farm will generally involve a combination of set stocking and some form of rotational grazing.
Remember the most expensive pasture is the one that fails to establish properly.
Such pastures have reduced productivity and carrying capacity, are more prone to weed invasion and have a reduced capacity to combat various aspects of soil degradation. These deficiencies continue throughout the entire life of the pasture. It rarely pays back the cost of establishment and it eventually has to be re-sown.
Further reading
Keys, M.J (1996) ‘Prime Pasture Establishment Field Guide’ NSW Agriculture booklet ISBN: 0 7310 5784 8. (Available from NSW Agriculture, PO Box 408, Queanbeyan 2620. Cost $20.)
Cornish, P.S (1984), ‘Soil physical requirements for germination, root development, plant production and survival’, Proceedings of the Riverina Outlook Conference, Wagga Wagga : 7.
Flemons, K.F., Cuthbertson, E.C and Cradock, F. (1963), ‘Drilling fertiliser with seed lifts early yields from coastal pastures’, The Agricultural Gazette, 74: 293.
Sund, J.M., Barrington, G.P. and Scholl, J.M. (1966), ‘Methods and depths of sowing forage grasses and legumes’, Proceedings of the 10th International Grasslands Congress: 319
Note
Livestock health disorders
Pasture improvement may be associated with an increase in the incidence of certain livestock health disorders. Livestock and production losses from some disorders are possible. Management may need to be modified to minimise risk. Consult your veterinarian or adviser when planning pasture improvement.
Native vegetation
The Native Vegetation Conservation Act (1997) may regulate some pasture improvement practices where existing pastures contain native species. Inquire through your office of the Department of Land and Water Conservation for further details.

