

How to tag game fish
Types of tags
Pelagic tag (A series) - Over 60cm for Tuna, Mackerel, Dolphinfish and Wahoo, and over 70cm for Kingfish.

Steel Head Shark tag (S series) - Sharks only.

Billfish tag (B series) - Marlin, Sailfish, Swordfish and Spearfish only.

How to make a tag pole
Attach the tag applicator to the end of a broom handle or similar pole.
For billfish and shark applicators, drill a small hole in the end of the pole and secure the applicator in position using strong epoxy based glue. Pelagic applicators are generally whipped to the end of the pole using nylon line and again secured with glue.
For billfish, ensure that approximately 75mm* of the applicator needle is exposed to ensure that tags are inserted the correct depth into the fish. For sharks and other game fish, ensure that approximately 50mm* of the applicator needle is exposed. Secure the tag to the pole with a rubber band or similar.


* Game Fishing Association of Australia (GFAA) guidelines specify that the tag needle for the billfish only tag must not protrude more than 76mm from the end of the tag pole or tag holding device, nor shall it exceed 8mm in diameter. The tag needle used for sharks and other game fish must not protrude more than 50mm from the end of the tag pole or tag holding device, nor shall it exceed 5mm in diameter.
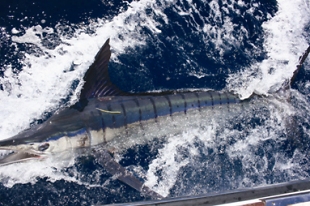
Recommended tagging areas
The images below show the recommended tagging areas on game fish:

How to tag game fish using the billfish and shark tags
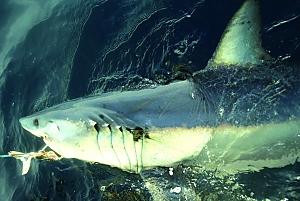
Billfish and shark tags are designed to lock into muscle tissue on the dorsal area of the fish, well above the lateral line. It is important to insert the tag to the correct depth - ~75mm for the billfish tag and ~50mm for the shark tag. Shallow or incorrectly placed tags may result in premature tag loss.
Once the angler brings the fish within range, the fish should be traced and led alongside the boat so that it presents a broad tagging target. It is usually best to keep the boat moving slowly forwards to enable better control of the fish.
Once the fish is in position for tagging, the person handling the tag pole should take position behind the person tracing the fish to allow for a clear tag shot.
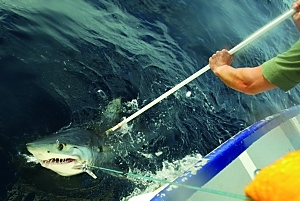
An attempt to apply the tag should only be made if the fish is calm or subdued. The tag should be placed towards the middle of the fish, well above the lateral line towards the dorsal fin (See recommended areas above).
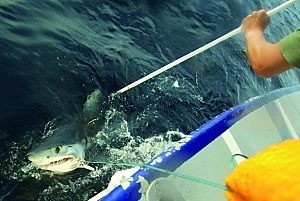
For billfish and most sportfish, the fish should be tagged with a firm, well-aimed stroke - simply place the tag against the fish’s flank and push. Do not stab. Sharks will require a firm jab in order to penetrate their tough skin.
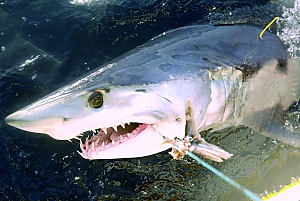
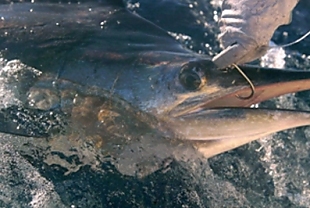
Once the tag has been placed, remove the hook if possible (a de-hooker can facilitate this) or cut the trace close to the fish’s mouth.
Revive any fish that appear to be exhausted or are struggling to remain upright in the water.
A commonly used approach for billfish is to hold the fish firmly by its submerged bill whilst the boat moves forwards at 2 to 3 knots. This ensures a good flow of water over the fish’s gills. The fish should only be released when it shows strong signs of life and displays improved skin colour, which may take several minutes or more. Exercise caution, especially in rough weather. Alternatively, use a snooter. This is a safe and effective tool for reviving billfish.
How to tag game fish using the pelagic tag

When tagging with the pelagic tag, the majority of fish should be removed from the water before tagging. This enables improved accuracy of tagging, may simplify hook removal and allow more accurate recording of the length and weight. For larger fish a short hand tagger can be used for tagging boat side. Try to prevent the fish damaging itself on hard, hot, or dry surfaces. A wet foam mat or similar is ideal (a wet towel will suffice) for on-boat tagging.

Pelagic tags should be inserted by hand tagger or short pole, as they are designed to lock behind the bony structures of the dorsal fin or second dorsal fin in order to stay in position. Carefully insert the tag into the fish’s back, close to the base of the fin and angled in so that it passes through the bony structures that radiate off the fin. Try to insert the tag at an angle of at least 45° to reduce water friction and then twist the tag pole before removing it. In effect, you should be trying to hook the barb of the tag around one of these spines, which then locks the tag in place.
With all tagging, fill out the tag card immediately and return to the department (or your fishing club recorder) as soon as possible, otherwise tagging is of no value.
Remember – successful tagging is a team effort.
Estimating the size of the fish
This may be done by estimating the weight of the fish or by measuring the fish when it is in, or alongside the boat. If the fish is up to a metre in length it may be carefully brought on board and measured using a standard measuring tape. However, large fish should remain in the water.
If you estimate the size of the fish, especially the weight, get a consensus from all the crew immediately after release, and record immediately.
For measuring length of fish in the water, it is best to rig up a simple tape measure. It helps if it is flexible, and at least 4 metres long. Attach a tennis ball to the zero end and when a fish is alongside, or being held at the back of the boat, float the tennis ball to the tail fork and get a measurement to the fish’s snout, or to the tip of the lower jaw for billfish. For billfish, it is important that the recorded measurement should state where the fish was measured from and to (i.e. lower jaw to tail fork length or total length - tip of bill to end of tail).
Giving both the length and the weight for every tag and release will allow the recording of the most complete information and result in the best comparison should the fish be recaptured or the data used in a scientific analysis.
What to do if you catch a tagged fish
Whenever you catch a fish, examine the dorsal area of both sides of the fish to see if a tag is present. The tags may only be just showing or may be obscured by marine growth if they have been in the fish for a long time.
If you catch a billfish, shark, tuna or other listed sportfish that is already tagged, carefully record the tag number or cut off the old tag and re-tag the fish with a new tag. Tags that look old may indicate that the fish have been at large for a long time and these long-term recaptures are particularly valuable.
Record all recovery information on the new tag card, if you don’t have a new tag, you may release the fish again with the same tag. Please ensure that you record the tag number, species, date, location and GPS co-ordinates, estimated size (or actual size if landed) and condition of fish on release. If you decide to take the fish, record the capture details on the attached tear-off slip.
One other point regarding reporting recaptures of tagged fish should be kept in mind. In these days of nearly 100% release of game fish, previously tagged fish are quite often caught and re-released without being able to retrieve the earlier tag. If you do hook and release a fish which has a tag in place, and you are not able to retrieve the tag, you should still record the details (even though the tag number is unknown) and report the release to the department as a genuine recapture. In this way, better statistics on actual recapture rates of game fish will be able to be maintained.
Tagging tips

- Use non-offset circle hooks whenever possible when using live or dead baits. These hooks minimise deep hooking, foul hooking and bleeding and promote the survival of tagged fish.
- Elect one crew member as the person in charge of the tagging equipment, to ensure that:
- the number of the tag in position on the tag pole matches that on the tag card
- details of the tagging are promptly recorded on the card
- the card is handed to the fishing club recorder or mailed to the department as soon as possible.
- Keep your tag cards in an orderly bundle. This will help to ensure that tags do not become loose and fall out of their corresponding tag card
- Load your tagging pole with a tag before you hook a fish to ensure that it is attached properly and is readily available whenever you wish to tag a fish.
- Make sure the billfish tag head fits neatly onto the applicator without being too tight as the tag may break before releasing into the fish. The shark tag head must protrude past the end of the applicator, this is vital as it is the tip of the tag head that penetrates the sharks tough skin. If the applicator is too long, then it can be filed down. Pelagic applicators may sometimes have rough edges inside the tube at either end. Try pulling a tag in and out to make sure the edges do not catch the tag, if they do, a small round file will take the rough edges off. If you do not do this then the applicator may cut the tag off as it goes into the fish.
- Tags should be secured on tag poles with a rubber band, one wrap of the band is sufficient as too many may stop the tag releasing.
- Check the length of your tag applicator. ~75mm for the billfish tag is the optimal length for most billfish - this ensures that the tag is placed at the correct depth and reduces the risk of the tag being shed by the fish. For the shark tag this depth is ~50mm and for the pelagic tag the depth varies with the size of the fish but can be up to 50mm.
- Do not attempt to tag very active fish, especially if the fish is jumping at the side of the boat. Poor tag placement can injure fish or result in the tag being shed. It is better to release the fish without tagging, if accurate tag placement is not possible.
